Our Project Prototyping Process
Our approach to preparing the project deliverables was methodical and sequential in nature, as we optimized the limited time allocated to us.
This approach can be divided into 3 parts:
(11 March 2024 to
31 March 2024)
(25 March 2024 to
15 April 2024)
(25 March 2024 to
17 April 2024)
Initial Prototyping Stages
With everyone's ideas and work in Part 3, we decided to compare and decide on whose ideas we would be adopting for Part 4. We continued to brainstorm and kick start the low fidelity prototyping for our planned ideas to visualize how our ideas would look like, with the modular scale and size taken into account.

Initial ideation sketches of ideas

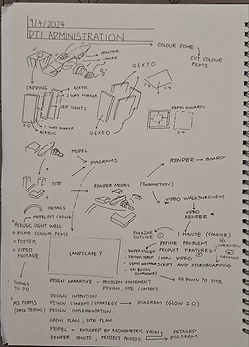
Overview of project Part 4 ideas and timeline planning
(with design sketches of pavilion)
An important method in visualising ideas is via pen and paper, as we sketched out our ideas and aligned them into one common design, be it through integration of elements or combining our designs together
(From bottom left to bottom right) design sketch iterations for Plane X Interactive Display


(From top left to top right; then leftmost to left) Design sketch iterations for Plane X Pavilion
Given the fact that 2-dimensional sketches may lack depth and lead to misinterpretations, it is important that we ensure that everyone has the same background idea on the intended purposes and function of our design concept. We did up some paper prototypes to gauge the scale of our model, any untapped potential and whether the idea is realistic, worth it and is a win.
In addition, we went to the campus sports track to gauge the size of our design concept for the Interactive Display to scale to determine if the dimensions of the screen is realistic and feasible from an engineering point of view.


Paper prototype mockups of the architectural site (left) and interactive message display (right)

From sketches of multiple ideas to deciding on our main project focus, ensuring that we are agreeable on a common direction

Visualization of the actual size of our projector screen at the campus field. We also managed to gather perspectives from our cohort mate (in white)
Prototype Preparation
Upon deciding on the ideas utilized, we proceeded onto the preparation of our deliverables. We made use of laser-cut wood and acrylic structures, electronics and 3D-printed components for our prototypes. In addition, with the technical expertise of one of our group members, we have also prepared a web application that is critical to the overall functional prototype.


(From top left to top, then leftmost to left) Budget and space planning for materials required to be laser cut.

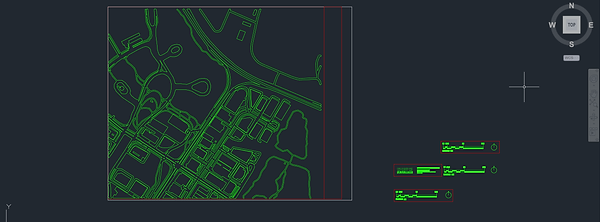

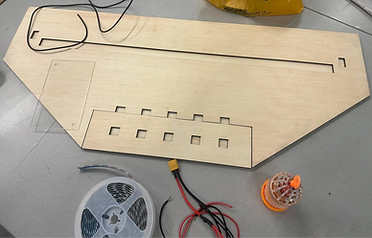
Left: Laser cut designs for (from top to bottom) the scale and supports, the site map drawing, and the functional model

Left: Schematic Drawing of interactive screen
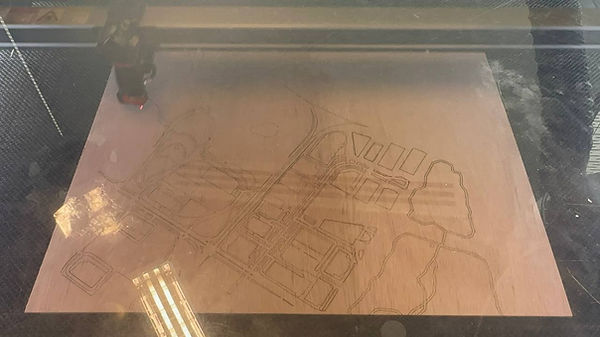
Left: Laser cutting of architectural model in progress

Left: The process of generating the design of both the architectural and site model using Rhino (in anti-clockwise direction)


Bottom: Grasshopper code (left) used to generate parametric design for Plane X Tail Pavilion (right)


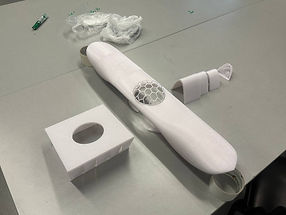
Left: Exploded Diagram of Infinity Mirror; The infinity mirror is made up of a 2 way mirror on the inside followed by the LED strips on the 3D printed casing accommodating it and lastly a 1 way mirror. When light is emitted within the space, some light passes through the 1 way mirror while some does not which gets reflected within into the 2 way mirror giving an illusion of an infinity into the mirror.
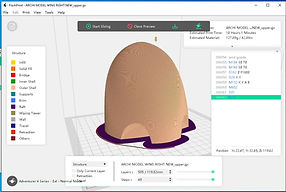
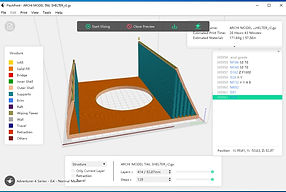
Left: STL Files for 3D printing of (from leftmost) wing tip and Plane X Tail Pavilion


Top (from left to right):
3D printed components of Plane X Wing Pavilion (except dome structure;
3D printed components of all other components in Plane X Pavilion (excluding interactive display); and
how all the printed parts combine to form the pavilion with an architectural abstract of a plane


Left: Failed 3D Prints during Fabrication but we overcome this obstacle by splitting the print further for it to 3D print successfully and assembled together later on. With this approach, we can build up the working prototype timely for the presentation.

Site model without the addition of electronics


From leftmost: Infinity mirror pieces; and the addition of LED light strips into the infinity mirror.
Right: The coloured hexagonal films on the dome are individually hand-cut and pasted


(From top leftmost and top left to leftmost and left):
Top and perspective view of interactive screen display without the pressure plate base; and
top and perspective view of interactive screen display without the pressure plate base; and

The process of building our interactive screen from its individual parts

Left: Electric circuit diagram for both our site model and interactive display screen.
This is to power up the LED strips and ultrasonic sensors located with the prototypes.
Below: Our project member working on the electrical installations for the interactive display.

User Testing
.jpg)
Once we were completed with ensuring that our functional prototypes work, we conducted user testing and surveys to test the effectiveness of our ideas in improving the user interactivity, and gather feedback about our prototype and ideas.
When our prototypes are completed, we commenced the physical testing of our prototype systems. Given the many components that impact the prototype, we underwent the 'wizard-of-oz' testing methods at the earlier stages as we worked on the seamless integration of the components to form one complete and functional prototype.
The feedback received are very positive, and our intended purpose of our design concepts are well captured and understood.
.jpg)
We allowed our cohort mates to try out elements of our functional prototype prior to the presentation, as we tested out the terminal web application (top) and the terminal application along with the interactive screen display and buttons that act as pressure plates (left)


In addition, a survey form was disseminated to the wider SUTD community to gather additional feedback about our design concept. Most people were initially unincentivised to visit our site; however with the added elements of light and display, they are now more intrigued to visiting our site.
As some commented about their worries on the brightness of the screen, we would take into consideration the display screen brightness levels to ensure that we have the optimal brightness display for the plane passengers while also ensuring the brightness of the site for the site visitors is comfortable and optimal.
Some comments when asked about our design concept:
"Intrigued, will look into going to the site"
"Such a bright area, so eye catching!"